PHP and HTML: HTML Forms
PHP is used primarily for server-side (e.g, a PHP server) programming for web-applications. A browser (running on the client-side) can accept user input via an HTML form and then, send the input to a remote PHP server.
For sending the user-input, the HTML form relies on a submit action that gets triggered when the user submits the form. The HTML form also accepts the name of a server-side PHP file and it is this file that receives the form input and then processes it.
PHP can also be used for interacting with server without an HTML form. It is becoming increasingly common for web applications to publish their services using an API-set. Instead of using an HTML form, a client can simply access these services using these APIs.
HTML Forms: Getting Started
An HTML form accepts input from users. In this aspect, an HTML form is similar to other types of (non-HTML) forms (e.g. a Tax Return Form, School Admission Form, etc) that also accept some form of user input (e.g. user identification, yearly income, past school grades, etc).
To understand the interaction between an HTML form and PHP, we provide (below) a simple HTML form; we name it "form_login.html".
 <!doctype html>
 <html>
 <head> <h3>A Trivial Login Form </h3></head>
 <body>

 <form name="input_form" method="POST" action="login.php">
 <br> Username:
 <input type="text" name="textUsername">
 <br> Password:
 <input type="password" name="passwordPassword"> <br>
 <input type="submit" name="submitButton" value="Login">
 <br><br><br>Feedback/Comments:<br>
 <textarea name="textareaComments">We appreciate your comments.  </textarea>
 </form>

 </body>
 </html>
Let us quickly understand the elements present in the above HTML form.
The form opens with <form> tag and closes with </form> tag. This opening <form> tag takes several parameters. The "name" parameter is the name of the form. The "method" parameter specifies the type of action that the remote server should execute after it receives the form data. The "action" parameter accepts the name of a server-side PHP file and it is this file that accepts and processes the form data.
An HTML form accepts two methods: POST and GET; if no method is specified, then the form defaults to the GET method. Both of these methods are used for sending information from the form to the server. Usually, we use GET method when the request does not change any state on the server and the POST method when the request carries data that can change the state on the server. An important difference between these methods is that the GET method has a built-in limit on the amount of data that can be sent to the server.
Yet another difference between these methods is that with GET method, the form elements and their values get encoded with the URL and thus, are visible on the browser address when we hit the submit button. With POST method, the form elements and its values do not get encoded. As per recommendation, we should use "GET" method when we want to read data from the server and we should use "POST" method when we want to write data at the server.
An HTML form provides several input types to allow users to fill different types of data.
For example, the above form has four input types: text, password, submit, and textarea. The "text" type is used for accepting alpha-numeric input from users. A similar input type is "textarea" and is used for providing multi-line input to a form. Next, the "password" type is also used for accepting alphanumeric inputs. However, when a user types in the "password" field, then the input is not displayed; instead, for the sake of security, each character is replaced by an asterisk! The "submit" type is a button type and when a user clicks this button, the input from this form is forwarded to the server.
Submitting HTML Form
In the above HTML form, the form submission (when we click the submit button) takes us from the "form_login.html" page to its action file, "login.php". As part of this submission, the form also transports the input form data to the action file.
When a form is called with "POST" method, then the web-server passes the input form data in the form of an associative array, named as $_POST array to the PHP action file; $_POST array is an alias for $HTTP_POST_VARS array. If the form method is "GET", then the HTML form would use $_GET array instead.
We provide below the flow of the HTML submission.
 		    HTML Form 					  Form Action File
 		-------------------- 				-------------------
 		|"form_login.html" |        ----------->	|   "login.php"   |
 		-------------------- 				-------------------

 		     Submit the Form. Form data is passed as $_POST array.

 	             Figure: HTML Flow when submitting a Form
Next, let us look at the action file (viz. "login.php") itself. This file (provided below) is nothing but a simple PHP file. It begins by printing the elements of the $_POST array; the keys of this array are the names of the form elements and their values are the data stored in these elements.
 <?php
 var_dump($_POST);
 $username = $_POST["textUsername"];
 $password = $_POST["passwordPassword"];
 $comments = $_POST["textareaComments"];

 echo "<br>The passed username is: $username <br>";
 echo "The passed password is: $password <br>";
 echo "The passed comments are: $comments <br>";
 ?>
To run the above HTML form, let us first store both the HTML file and its action file at a location that is accessible to the web server (in Fedora/Red Hat Linux, the default location for web server is "/var/www/html/"). We can keep the action file ("login.php") in the same directory as that of "form_login.php"; if it is not, then we need to provide the full path (for example, <form ... action="./foo/login.php"> if it is stored in a "foo" directory in /var/www/html directory).
Next, we need to ensure that the web server itself is running. When we load this file from a browser ("http://localhost/form_login.html"), we should see the following output on the browser.
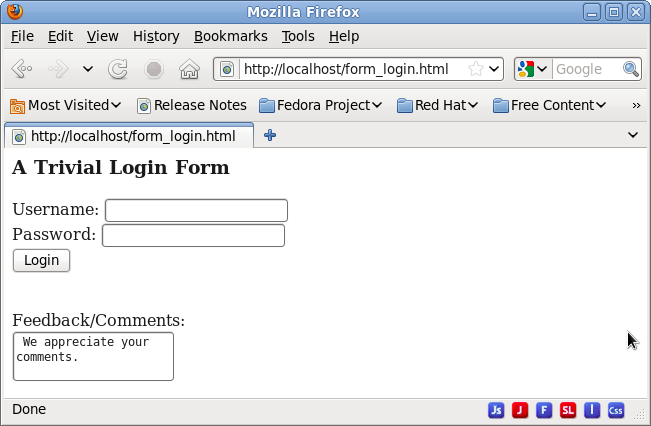
Figure: Form Login
If we input username as "user1001" and password as "password1001" and then click the "Login" button, then the form takes us to its action file, "login.php" page. From the output, we see that $_POST array has four elements: textUsername, passwordPassword, submitButton, and textareaComments. As expected, these are names of various HTML form fields defined in the "form_login.html" page.
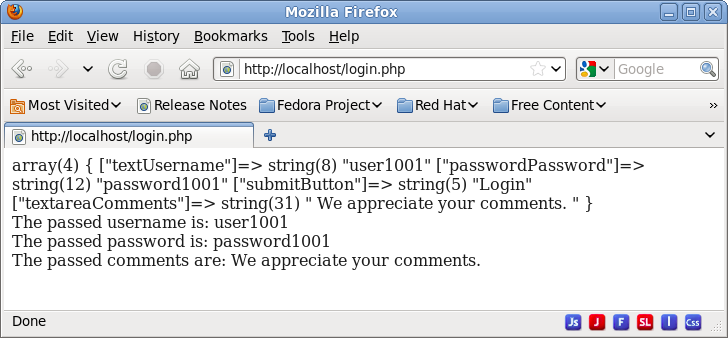
Figure: Action Method: PHP Login page
HTML Form List Input: Checkbox, Radio, and Select
Besides text, textarea, password, and submit input types, HTML forms also provide elements for selecting values from a list: checkbox, radio, and select.
A checkbox allows selection of one or more options from a list. Each option of the checkbox list needs to have the same name but should have different values. There are two ways to specify the name of these options.
In the first approach, we can specify the name as a simple string (e.g. "name=checkboxFriend"). This approach means that we allow only one selection. If we check two options from the list, then the new selection simply overwrites the earlier selection! When we submit the form, then the $_POST array holds a key as the checkbox name (e.g. $_POST["checkboxFriend"]) and its value as the value of the selected option.
In the second approach, we can provide the name as a string followed by square brackets "[]" as in an array (e.g. "name=checkboxFriend[]"). This approach allows multiple selections. When we submit the form, then the $_POST array holds a key as the checkbox name (e.g. $_POST["checkboxFriend"]) and its value as an array that stores values of all the selected options.
Each option of the the checkbox should have a different value. If they have the same value, then upon selection, the $_POST array ($_POST["checkboxFriend"]) would end up holding the same value, irrespective of the selection; thus, the action file would fail to identify the selected option. Likewise, if we allow multiple selections (when the name is a string followed by "[]"), then the $_POST["checkboxFriend"] array will hold multiple entries with the same value, pertaining to multiple selections. Hence, it is important to keep different values for different checkbox selections.
Please note that we can also provide different names to various options of the checkbox list. But, then this approach is similar to have several groups of checkboxes, where each group holds only one option.
One special case is when we do not provide any value to the checkbox options. If such option is selected, then HTML assigns a default value of "on" to that option.
The next input type, radio button, also enables us to select only a single option from a list of options. For this to be the case and similar to that of a checkbox, all the radio buttons belonging to one list, should have the same name. Once again, to distinguish various radio buttons that belong to a list, we need to assign different values to them. Like the case of checkbox, the only way to allow multiple selections is to use radio buttons with different names; but, with this method, these options no longer belong to the same radio button list!
The last type of list-based input type is that of select. With "select", the list appears as a pull-down menu on the browser. Like a checkbox, a select box can also allow multiple selection. For allowing multiple selections, we need to do two things. First, we should add "multiple="multiple"" value in the select opening tag. Second, we should name the select box as an array, e.g. "name=selectbox[]".
After having described these three list types, we provide below a simple HTML form ("form_options.html") to illustrate their usage. For checkbox type, we show both single and multiple selection styles.
 <!doctype html>
 <html>
 <head> <h3>Inviting friends for a Dinner Party </h3></head>
 <body>

 <form name="invite_friends" method="POST" action="invite_options.php">

 <b> Checkbox (single selection): Please select one friend to send a invite: </b> <br>
 Everyone     <input type="checkbox" name="checkboxFriend1" value="all"> <br>
 James Fulton <input type="checkbox" name="checkboxFriend1" value="jfulton">
 Mona Simpson <input type="checkbox" name="checkboxFriend1" value="msimpson">
 Amanda Moore <input type="checkbox" name="checkboxFriend1" value="amoore">

 <br><br><b> Checkbox (multiple selection): Please select one or more friends to send a invite: </b> <br>
 Everyone     <input type="checkbox" name="checkboxFriend2[]" value="all"> <br>
 James Fulton <input type="checkbox" name="checkboxFriend2[]" value="jfulton">
 Mona Simpson <input type="checkbox" name="checkboxFriend2[]" value="msimpson">
 Amanda Moore <input type="checkbox" name="checkboxFriend2[]" value="amoore">

 <br><br><b> Radio Button: Please select a location for the occasion: </b> <br>
 None of these          <input type="radio" name="radioInvite" value="all"> <br>
 Sun Cafe               <input type="radio" name="radioInvite" value="sunCafe">
 Orange Tree Restaurant <input type="radio" name="radioInvite" value="orangeTreeRestaurant">
 Pacific Dinner House   <input type="radio" name="radioInvite" value="pacificDinnerHouse">

 <br><br> <b> Select List: Please indicate your preference for Wine: </b> <br>
 <select name="wine[]" multiple="multiple">
 <option value="all"> All </option>
 <option value="Champagne"> Champagne </option>
 <option value="Pinonoir"> Pino Noir </option>
 <option value="Merlot"> Merlot </option>
 </select>

 <br><br> <input type="submit" name="submitLogin" value="Send Invite">
 </form>

 </body>
 </html>
The above HTML form passes PHP file "invite_options.php" (provided below) as action type. Let us describe this file.
The action file begins by printing each of the elements passed via the $_POST array using var_dump(); the file uses $_POST array since the form (in "form_options.html") uses "POST" method.
For the case of single selection using checkbox, we use a switch statement to find the selected option. For the case of multiple selection using checkbox, we use array to find all the selected options. Also, for the sake of simple display, where ever the user can select all choices or single choices (e.g all wine or specific wine), the code first checks if the choice is "all". If that is the case, then it sets the selection to all; otherwise, it displays all the individual choices.
 <?php
 var_dump($_POST);
 echo "<br>";

 /* Let us print the selection from checkbox (single selection case) */
 echo "<br><b> First Method: Friends selected </b><br>";
 switch ($_POST["checkboxFriend1"]) {
      case "all":
 	echo "Friend selected: All <br>";
 	break;
      case "jfulton":
 	echo "Friend selected: James Fulton <br>";
 	break;
      case "msimpson":
 	echo "Friend selected: Mona Simpson <br>";
 	break;
      case "amoore":
 	echo "Friend selected: Amanda Moore <br>";
 	break;
      default:
 	break;
 }

 /* Let us print the selection from checkbox (multiple selection case) */
 echo "<br><b> Second Method: Friends selected </b><br>";
 $friends = '';
 $friends = $_POST["checkboxFriend2"];
 $friends_all = in_array("all", $friends);
 if ($friends_all) {
     echo "Friend selected: All <br>";
 } else {
     foreach ($friends as $element) {
         echo "Friend selected: $element <br>";
     }
 }

 /* Let us print the selection from the radio buttons */
 $location = '';
 $location = $_POST["radioInvite"];
 echo "<br> <b>Location selected </b>: $location <br>";

 /* Let us print the selection from the select list */
 echo "<br><b>Wine selected: </b><br>";
 $wine = '';
 $wine = $_POST["wine"];
 $wine_all = in_array("all", $wine);
 if ($wine_all) {
     echo "Wine selected: All <br>";
 } else {
     foreach ($wine as $element) {
         echo "Wine selected: $element <br>";
     }
 }
 ?>
When we load the HTML form, here is the HTML form. We also show selections of various form elements.
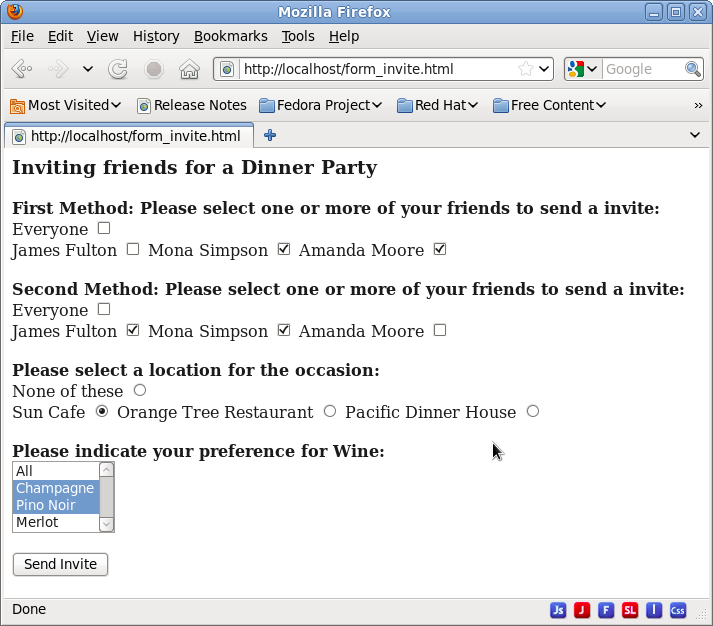
Figure: Invitation HTML Form
When we select the "Send Invite" button on the form, it leads us to the action file ("invite_options.php"). We provide the text output displayed by the browser below. The output shows the elements present in the $_POST array.
 array(5) { ["checkboxFriend1"]=>  string(6) "amoore"
            ["checkboxFriend2"]=>  array(2) { [0]=>  string(7) "jfulton" [1]=>  string(8) "msimpson" }
            ["radioInvite"]=>  string(7) "sunCafe"
            ["wine"]=>  array(2) { [0]=>  string(9) "Champagne" [1]=>  string(8) "Pinonoir" }
            ["submitLogin"]=>  string(11) "Send Invite"
 }

 First Method: Friends selected
 Friend selected: Amanda Moore

 Second Method: Friends selected
 Friend selected: jfulton
 Friend selected: msimpson

 Location selected : sunCafe

 Wine selected:
 Wine selected: Champagne
 Wine selected: Pinonoir
As expected, the single selection method with checkbox lists only one choice and the multiple selection method with checkboxes lists multiple choices. Likewise, with wine-selection, we are able to list multiple selections as well.