HTML and CSS: CSS Selectors
In addition to selecting HTML elements by their name and tag, CSS provides two additional ways to get hold of elements: (a) CSS id and (b) CSS class. When specifying selectors for these two types, CSS uses the convention of using a hash character ("#") to refer to a CSS id and a dot character (".") to refer to a CSS class name. Besides these, there are additional selector types as well like pattern-based, attribute-based, etc. For more on these selectors, you can visit our CSS module.
CSS allows only one element on a page that can have a given CSS id. On the other hand, CSS allows multiple elements to have the same class name. Of course, an element can have both CSS class and CSS id and if needed, an element can have more than one class as well. An easy way to remember this is to think of a class as a room full of students. The classroom can have many students, but each student needs to have a unique student id!
Together, the combination of CSS id and CSS class provides a flexible design for selecting HTML elements; as per the need, we can be specific or generic. For example, if we would like to provide a unique behavior to an element (let us say the navigation bar), then we can identify it using a CSS id. On the other hand, if we would like to provide an identical design/behavior to all tabs in the navigation bar, then we can keep all of them in a common CSS class.
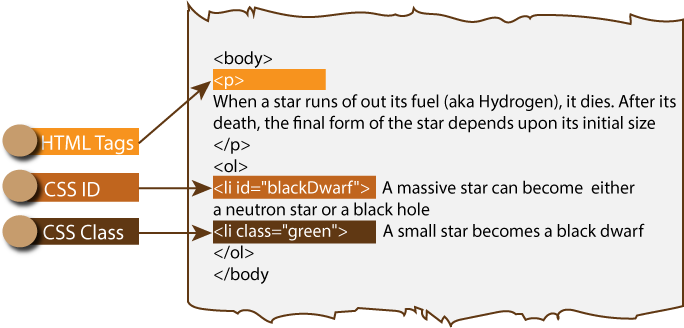
Figure: Different Types of CSS Selectors
Examples
Let us now look at some examples that highlight selection of elements using the CSS class and CSS id. All of these examples use the same HTML structure. For adding CSS rules, the HTML code links a CSS file ("stars.css") that holds these rules. For all examples on this page, we keep the HTML code same and simply update the CSS file.
So, without any further delay, let us see our first example. The HTML content in this example (provided below) is fairly simple. It has a paragraph element and an ordered list. Among these HTML elements, we use two CSS classes: "blue" and "green". Next, the ordered list that has its own list element and the example assigns different ids to two of those list elements.
 <!doctype html>
 <html>
 <head>
     <title> Adding Design to an HTML Page! </title>
     <link type="text/css" rel="stylesheet" href="stars.css">
 </head>
 <body>
     <p class="blue"> When a star runs of out its fuel (aka Hydrogen), it dies. After its
         death, the final form of the star depends upon its initial size:
     </p>
     <ol>
         <li class="green" id="blackDwarf"> A small star becomes a black dwarf
         <li class="blue" id="whiteDwarf"> A medium star becomes a white dwarf
         <li class="green"> A massive star can become either a neutron star or a black hole
     </ol>
 </body>
 </html>
Our first example focuses on selecting elements using CSS class. The syntax to do that is straightforward -- we specify the name of the class and as per the CSS syntax, add a dot operator ("." ) before the name of the class. The CSS for this example adds rules for both CSS classes: "blue" and "green". Here is the CSS file.
 /* This rule adds style to the "blue" class elements. */
 .blue {
     font-family: Helvetica, Verdana, sans-serif;
     color: blue;
     font-weight: bold;
 }

 /* This rule adds style to the "green" class elements. */
 .green {
     font-family: Helvetica, Verdana, sans-serif;
     color: green;
     font-style: italic;
 }
If we were to load the above HTML page, we would see that all elements belonging to the "blue" class have a bold font and blue color. On the other hand, all elements belonging to the "green" class have an italics font style and a green color. Here is the output:
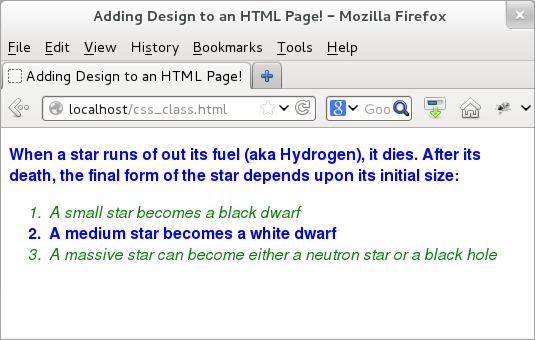
Figure: CSS class Selector
Our next example shows the usage of CSS ids so that we can be more specific. For that, we retain the earlier HTML page and merely update the "stars.css" CSS file. The file locates two of those elements that have CSS id values (#blackDwarf and #whiteDwarf) and assigns different rules for them.
 /* This rule adds style to the "blackDwarf" id elements. */
 #blackDwarf {
     font-family: Helvetica, Verdana, sans-serif;
     color: blue;
     font-weight: bold;
 }

 /* This rule adds style to the "whiteDwarf" id elements. */
 #whiteDwarf {
     font-family: Helvetica, Verdana, sans-serif;
     color: green;
     font-style: italic;
 }
If we now load our HTML page with modified "stars.css" file, we would see that only the two <li> elements that have the CSS id values of #blackDwarf and #whiteDwarf have different styles. Rest of the elements continue to have the default style. Here is the output.
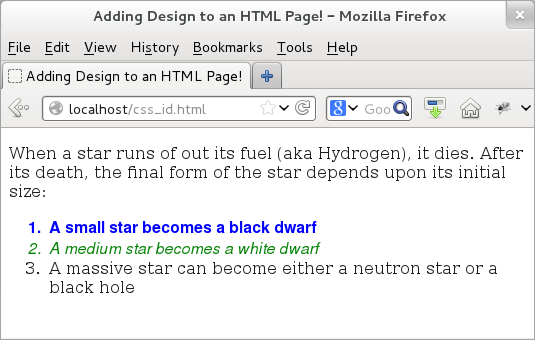
Figure: CSS id Selector
But we can do (a lot) more. With CSS selectors, we can even mix and match! For that, let us see the last avatar of "stars.css" file. Here we we add rules for both "blue" class and for "blue" classes belonging to the para element (as "p.blue"). The syntax keeps the parent selector first, then adds a dot operator (".") and then keep the child selector. With that, now all elements in the "blue" class would appear to have a blue color with the only exception of all "blue" class elements that sit within the paragraph element -- they would now be rendered as maroon. Here is the new CSS file:
 /* This rule adds style to the "blue" class. */
 .blue {
     font-family: Helvetica, Verdana, sans-serif;
     color: blue;
     font-weight: bold;
 }

 /* This rule adds style to the "green" class. */
 .green {
     font-family: Helvetica, Verdana, sans-serif;
     color: green;
     font-style: italic;
 }

 /* This rule adds style to the "blue" class belonging to para elements. */
 p.blue {
     font-family: Helvetica, Verdana, sans-serif;
     color: maroon;
     font-weight: bold;
 }
The output (provided below) confirms the updated design.
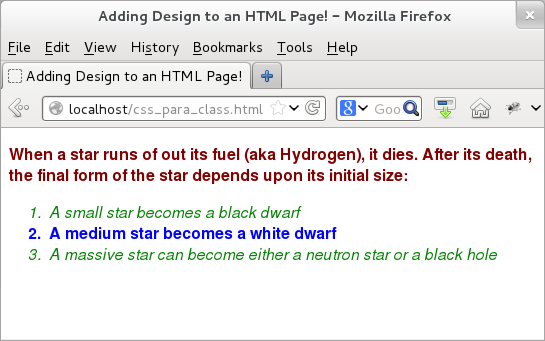
Figure: Combination of CSS class selector and CSS id selector
More on CSS
Before we wrap this up, there are two CSS behavior that we would like to discuss briefly: inheritance and conflicts.
If we apply a design to a parent element, then the design would automatically be applied to all the child elements. This is inheritance. Thus, in the above example, if we keep some other element (let us say <em>) within the paragraph element and apply a design rule to the paragraph element, then that rule would be applicable to the <em> element as well.
Like most of the rules, there is an exception to this rule as well! The rule would hold for the child elements only if the CSS design property is applicable to that rule. Thus, if the <p> element has an <img> child element, then the font based properties would not apply to the image element since we cannot apply font-design rules to an image element!
The other thing is that of conflict. If we have two rules for the same element, then CSS would choose the rule that is more specific. In the above example, if we keep the <ol> element under a rule and then specify additional rule for one of its <li> element (let us say, the one with CSS id #blackDwarf), then CSS would NOT apply rules for the <ol> class elements to the selected <li> element -- instead, it would apply the more specific rule to that. If things get worse and we specify the same rule to the same element, then CSS would look for the ordering in the CSS file -- the one specified later in the CSS file is given preference.