HTML and CSS: Introduction
For an HTML page, the design/style aspect is provided by Cascading Style Sheets (CSS) elements. When adding a CSS style, we have to keep two things in mind. First is the selection of an element (or elements) where we need to apply the style. Second, is the set of rules that we can apply to the selected element (or elements).
When it comes to adding style itself, we can do that in several different ways. First, we can use the <style> element of the page itself and add styles to various elements. Second, we can use the <link> element to include an external CSS file that contains various design rules; the <link> tag does not have a closing tag and hence, is an empty tag. Along the same lines, CSS also provides an @import directive, where we can specify the location of the CSS file. Lastly, we can also use a script (e.g. JavaScript or jQuery) -- the script selects an element (or elements) and adds style to it (or them) dynamically. We would focus on the first two methods here. For discussion on the third style, please visit our jQuery module.
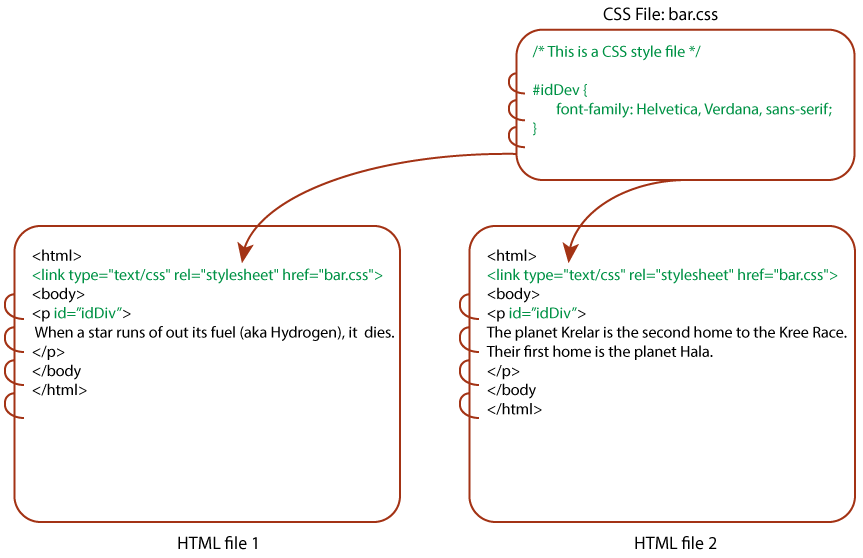
While it is acceptable to use the <style> element to add simpler design to a (relatively simpler!) page, the recommended approach is to either use the <link> method to add an external CSS file or to add (dynamic) design using a script, once again using an external script file. The advantage of using external CSS file or an external script is that we can embed the same file in multiple HTML pages instead of having to provide the same design rules in multiple pages; clearly, this is good for code-reusability. The illustration below shows an external CSS file that is included in multiple pages.

Figure: Including a CSS file into Multiple HTML Files
In addition, keeping the design file separately also makes HTML code less cluttered and thus, improves code-readability. As an HTML author, we should always keep in mind both code-reusability and code-readability.
With that, let us get going and see an example. The example (provided below) specifies a simple CSS rule for adding font and color to paragraph (<p>) elements.
 p {
     font-family: Verdana, sans-serif;
     color: blue;
 }
In the above CSS rule, the first token (which is "p" here) before the opening braces is referred to as the selector -- this element is the element that undergoes the style-upgrade! Following that, we have two lines, where each lines provides a value to a style property name. Each line ends with a semi-colon. All of the above CSS elements -- the selector, the block, and the rules -- are referred to as one single CSS rule.
Now, some more thoughts about the above two lines. The first line specifies the values for the "font-family" property. This property can take one or more font types, separated using commas. The fonts are provided in the decreasing order of priority. By providing two fonts, we are saying that we would like to use the "Verdana" font as our first preference. If that is unavailable, then we are okay with "sans-serif"! The second property that we specify is the "color" property and it sets the text-color to the "blue". Thus, for this page, every paragraph would have text with blue color and font as the first available font from the "font-family" list.
In fact, we can use the same rule and apply it to more than one element! If we wanted to extend the above rule beyond <p> element, then that is as simple as specifying additional elements in the selector list but we need to keep them separated by commas. Let us extend the above rule to not only include <p> but also the ordered list (<ol>) and unordered list (<ul>) elements.
 p, ol, ul {
     font-family: Verdana, sans-serif;
     color: blue;
 }
Examples
Now that we have covered some of the basics, let us get our hands dirty. We start with a simple HTML page and use CSS design to add some style. The CSS in this example has two rules: one for the <p> element and the other for the <ol> element.
 <!doctype html>
 <html>
 <head>
     <title> Adding Design to an HTML Page! </title>
     <style>
         p {
             font-family: Helvetica, Verdana, sans-serif;
             color: blue;
         }
         ol {
             font-family: Helvetica, Verdana, sans-serif;
             color: red;
         }
     </style>
 </head>
 <body>
     <p> When a star runs of out its fuel (aka Hydrogen), it dies. After its
         death, the final form of the star depends upon its initial size:
     </p>
     <ol>
         <li> A small star becomes a black dwarf
         <li> A medium star becomes a white dwarf
         <li> A massive star can become either a neutron star or a black hole
     </ol>
 </body>
 </html>
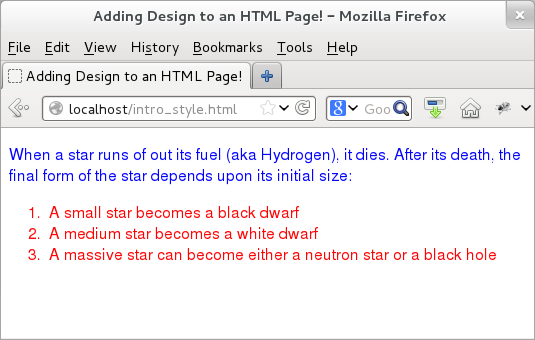
When we load the page (output provided below), we find that the paragraph text has the font-color as blue and the ordered list items have the font-color as red. In addition, these elements also have the text as one of the fonts: "Helvetica", "Verdana", or if they are not available, then the fall-back option of "sans-serif". Pretty much what we expected!

Figure: HTML Page with CSS
Since the recommended way is to keep the style element using an external CSS file, let us rewrite the above example to do that. We start with the content that goes in the "stars.css" file. Note that the file itself does not contain the "style" or the "css" keyword.
 /*
  * This file adds style to an HTML page.
  */
 p {
     font-family: Helvetica, Verdana, sans-serif;
     color: blue;
 }
 ol {
     font-family: Helvetica, Verdana, sans-serif;
     color: red;
 }
Next, let us update the HTML page to include this CSS file. The main difference would be that we need to keep the CSS rule in a separate file (let us call it "stars.css") and embed the file using the <link> element. Like the <a> element, the link element contains the href attribute that points to the location of the CSS file. The "rel" attribute specifies that the relationship between the current document (the HTML page) and the CSS file. The value of the "rel" attribute says that we would be using the linked CSS file as a stylesheet.
 <!doctype html>
 <html>
 <head>
     <title> Adding Design to an HTML Page! </title>
     <link type="text/css" rel="stylesheet" href="stars.css">
 </head>
 <body>
     <p> When a star runs of out its fuel (aka Hydrogen), it dies. After its
         death, the final form of the star depends upon its initial size:
     </p>
     <ol>
         <li> A small star becomes a black dwarf
         <li> A medium star becomes a white dwarf
         <li> A massive star can become either a neutron star or a black hole
     </ol>
 </body>
 </html>
It is worth mentioning that the type attribute (that has a value of "text/css") in the above example is needed for HTML 4 only! With HTML5, the "text/css" is the default value and so we do not have to add this attribute if we are using <link> element to refer to a CSS file. The output is same as before and so we omit it.
In the above examples, we have used two CSS properties: font-family and color. These two are just the tip of the iceberg! CSS has a lot more to offer. We specify some of the common ones in the following table. For a more exhaustive list, we recommend the reader to pick up a good book on CSS.
| CSS Property | Description | Example or Possible Values |
|---|---|---|
| font-family | Preference list of font names separated by commas | Example -- font-family: Helvetica, Verdana, sans-serif; |
| font-weight | Boldness of a font | Possible values are inherit, normal, bolder, bold, lighter, etc. Example -- font-weight: bold |
| font-size | Size of the font in a box | Example -- font-size: 200% or font-size: 2.0em |
| font-style | Italics or not | Possible values are inherit, normal, italic, oblique |
| list-style | Style of the list maker | Example -- list-style: square inside; |
| border | Adds a border around the element | Example -- border: 1em dotted; |
| text-align | Text-alignment in a block | Possible values are inherit, left, right, center, justify. Example -- text-align: center; |
| line-height | Height of a line of a text | Possible values are a number, a percentage, a length, or inherit and normal. Example -- line-height: 200%; |
| background-color | Background color of a box | Possible values are inherit, transparent, or value of a color. Example -- background-color: blue; |
This page focuses on CSS from an HTML perspective and it is difficult to cover CSS since that topic is huge by itself. To read more about CSS, please visit our CSS module.