HTML Forms: Introduction
A browser accepts user input via an HTML form and then sends that input to a web server. In terms of being able to accept input from users, an HTML form is similar to other types of (non-HTML) forms. These non-HTML forms (e.g. a Tax Return Form, School Admission Form, etc) also accept some form of input (e.g. user identification, yearly income, past school grades, etc).
The form element is identified by the <form> tag. The form element in turn has several elements that accept user input -- these elements are identified by <input> tags. These input elements can help users fill text-data, select from various options, select from a list, etc. These form elements can also have a name. It is not necessary for every HTML page to have a form -- only those pages that need to accept user-input should have the form element.
For sending input, the HTML form relies on a submit action that gets triggered when the user submits the form. The HTML form also accepts the name of a server-side PHP file and it is this file that receives the form input and then processes it. The form input is sent to the server as name/value pairs, where name refers to the name of form element specified in the HTML page and the value refers to the user input for that particular element. For retrieving values filled by the user, the server file must use the same names as provided in the HTML form.
For handling input, a browser interacts with the web-server in roughly three steps. In the first step, it requests the HTML page that has the form, then waits for the user to fill in the form data. In the second step, the browser sends this data to the server once the user provides form-input the submits the form. In the last step, the server processes the user-input and if needed, it sends a response page.
To understand forms a little bit better, let us get going and see a simple example. The example (provided below) is an HTML file that contains a form; we name the file "form_intro.html". The HTML form aims to get text-input from user about moons; let us say, we have a system that accepts input about moons from astronomers and add their info to a database. For each moon, the user can provide its planet (after all, moons orbit around their planets!) and a description of that moon. Once the user is done filling the information, she can hit the submit button.
 <!doctype html>
 <html>
 <head>
     <title> Update Info about Moons </title>
 </head>
 <body>
 <h4>Add Info about Moons</h4>

 <form name="inputMoonInfoForm" method="POST" action="addInfoMoon.php">
     <br>Moon Name:   <input type="text" name="textMoonName">
     <br>Planet Name: <input type="text" name="textPlanetName">
     <br>Moon Info:   <textarea name="textareaDescription" rows="3" cols="25">
                             Notes on moon</textarea>
     <br><br>         <input type="submit" name="submitButton" value="Add Moon Info">
 </form>
 </body>
 </html>
Let us examine the elements present in the above HTML form.
The form opens with <form> tag and closes with </form> tag. No surprises there! The opening <form> tag however takes several parameters and so it is worth another look. The "name" parameter is the name of the form. The "method" parameter specifies the type of action that the remote server should execute after it receives the form data. The next attribute is the "action" parameter. This parameter accepts the name of a server-side file and it is this file that receives the user-input and processes it. For the sake of example, we keep the server file as a PHP file. However, the script file could be a script file of other types as well, like Python, ASP, etc.
While we are at it, let us give some more thoughts to the "method" attribute. An HTML form can accept two values for the method attribute: POST and GET; if no method is specified, then the form defaults to the GET method. There are a few differences between these methods. Usually, we keep GET method when the request does not change any state on the server and the POST method when the request carries data that can change the state on the server. An important difference between these methods is that the GET method has a built-in limit on the amount of data that can be sent to the server. The third difference between these methods is that with GET method, the form elements and their values get encoded with the URL and thus, are visible on the browser address when we hit the submit button. With POST method, the form elements and its values do not get encoded in the URL. As per recommendation, we should use "GET" method when we want to read data from the server and we should use "POST" method when we want to write data at the server.
An HTML form provides several new types to allow users to fill different types of data. These are identified using the <input> tag. For example, the above form has two input types: text and submit. The "text" type is used for accepting alpha-numeric input from users. An element similar to the "text" element is the textarea element and is used for providing multi-line input to a form. The textarea is not a type of input like text, select, etc; instead, it is an independent HTML element.
The "submit" input type is a button type and when a user clicks this button, the input from this form is sent to the server. While <input> elements (should) sit within the <form> tags, we can nest non-input elements within the form as well. For example, in the above form, we have <br> elements to add line-breaks.
If we were to load the above page, we would see the following output. For this web-application, the user should fill in various information (like name of the moon, the planet it orbits and some additional info). Once done, the user can hit the "Add Moon Info" button to send the data to the server -- it is this button that triggers the submit step.
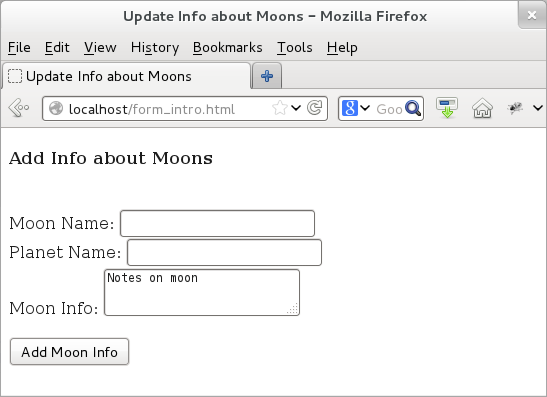
Figure: HTML Forms
Unlike the <form> tag, the <input> tags do not come with closing tags. This is because the <input> tag is one of the empty elements and does not require any closing tag. Whatever attribute is needed, we can simply specify it in the <input> tag itself. One additional note on these input elements: while they should be used with the <form> tags, it is valid to use them even outside of the <form> tags. We should use these elements outside of the <form> tags only if we know what we are doing! For almost all of the cases, we would be okay by keeping these elements within the <form> tags.