Styling Tables
A table is an important HTML element that help us present data in a more usable format. Learning how to design tables to suit the task is fairly important. Hence, let us take a look at some of the CSS properties that add design to HTML tables. In particular, we look at three CSS properties: caption-side, border-collapse, and border-spacing. Besides these properties, the common box-related properties (like padding, border, margin, etc) continue to apply to table and table cells as well.
Before we go ahead further, let us familiarize ourselves with these properties first.Usage: caption-side: [top | bottom | left | right] | inherit;
Description: Specifies the location for adding the caption for the table. A value of top means that the caption would be kept above the table. On the other hand, a value of "bottom" means that it would be placed beneath the table. Similar argument holds for "left" and "right" values. If we do not specify the value, then the default value is "top". If we set the value as "inherit", then the caption-side value is taken from that of the parent.
Example: Specifying "caption-side: top;" would keep the caption on top of the table.
Usage: border-collapse: [collapse | separate] | inherit
Description: This property allows us to specify if we would like to collapse the borders of individual cells of a table. If the value is "separate", then the borders of the individual cells is kept separate and we can see the space between them. However, if we set the value as "collapse", then the borders are show as one single line. If we set the value as "inherit", then the border-collapse value is taken from that of the parent.
Example: Setting "border-collapse: collapse;" would collapse the border between two adjoining cells.
Usage: border-spacing: <value> {1,2} | inherit;
Description: The value specifies the distance between the two neighboring cell borders. If one length is specified, then it specifies both the horizontal and vertical spacing. However, if we want we can specify horizontal and vertical spacing separately -- the first is for the horizontal spacing and the second is for the vertical spacing. The specified length cannot be negative. If we set the value as "inherit", then the border-spacing value is taken from that of the parent.
Example: Setting "border-spacing: 5px;" would set the border spacing between two adjoining cells as 5px. This property works opposite of border-collapse.
With that, let us see examples to better understand the above properties. Since each HTML
element, including table, table cells, are boxes, the examples would also assign certain
bare-minimum box-related CSS properties to them as well.
Our first example focuses on the caption-side property along with a few border related properties. To help understand properties for tables better, we the HTML page (provided below) consists of two HTML tables. The first one is identified by CSS ID "name_meaning" and the second one is identified by CSS ID "dinosaur_geological_period". The idea behind keeping two tables is that we can compare and contrast the behavior of these properties.
 <!doctype html>
 <html>
 <head>
     <title> Learning CSS: Designing Tables </title>
     <link type="text/css" rel="stylesheet" href="table.css">
 </head>
 <body>

 <table id="name_meaning">
 <caption> Table1: Dinosaurs names and their meanings </caption>
 <tr><th> Name</th>               <th> Meaning </th></tr>
 <tr><td> Tyrannosaurus Rex </td> <td> King among Tyrant Lizards </td></tr>
 <tr><td> Allosaurus </td>        <td> Strange Lizard </td></tr>
 <tr><td> Triceratops </td>       <td> Face with three horns </td></tr>
 <tr><td> Velociraptor </td>      <td> Speedy Robber. These were pretty fast </td></tr>
 </table>
 <br><br>

 <table id="dinosaur_geological_period">
 <caption> Table2: Dinosaurs and Geological Period </caption>
 <tr><th> Dinosaur </th>          <th> Geological Period </th></tr>
 <tr><td> Tyrannosaurus Rex </td> <td> Late Cretaceous period </td></tr>
 <tr><td> Allosaurus </td>        <td> Jurassic period </td></tr>
 <tr><td> Triceratops </td>       <td> Late Cretaceous period </td></tr>
 <tr><td> Velociraptor </td>      <td> Late Cretaceous period </td></tr>
 </table>

 </body>
 </html>
The above HTML file includes the "table.css" CSS file. This file assigns different CSS properties to both the tables. The value of the caption-side property is kept as "top" for one and "bottom" for the other one. In addition, we add a border for the first table but for the second one, we do not add one. Along the same lines, for the cells belonging to the first table, we add padding for both table header and table data cells. For the second table, we again do not add any border or padding for header and data cells. Here is the CSS file.
 caption {
     font-weight: bold;
     color: brown;
 }

 table#name_meaning {
     caption-side: top;
     border: medium solid brown;
 }

 table#name_meaning th, table#name_meaning td {
     border: thin solid orange;
     padding: 8px;
 }

 table#dinosaur_geological_period {
     caption-side: bottom;
 }
So, let us fire up the browser and see how the above HTML page looks like!
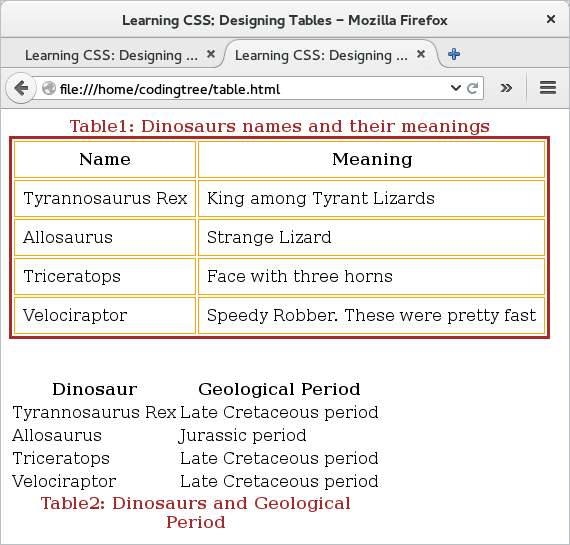
First thing we can note is that the table caption is located at the top for the first table and at bottom for the second table. In addition, we would see that the first HTML table has a lot more design bells and whistles but the second one appears rather bland. The first table has a (solid brown) border. In fact, each table header and table data cells have a border of their own. Lastly, these header and data cells also have a padding. This example demonstrates the contrast when we add (CSS) design to a table versus the case when we do not.

Figure: Table Design: caption-side
The next example shows the usage of the border-collapse and border-spacing properties. For that, we reuse the earlier HTML file and simply update the CSS file (in this case, "border.css"). This file starts by assigning some common design to both tables -- the first three rules are assigned to both tables. Following that, we assign the value of border-collapse as "collapse" to first table and "separate" to the second table. In addition, we also assign border-spacing value to be 5px for the second table. The idea is that the first table would have its cells collapsed (no separate lines for each cell) but the second table would have its cells with separate borders.
 caption {
     font-weight: bold;
     color: brown;
 }

 table {
     caption-side: bottom;
     border: medium solid brown;
 }

 th, td {
     border: thin solid orange;
     padding: 4px;
 }

 table#name_meaning {
     border-collapse: collapse;
 }

 table#dinosaur_geological_period {
     border-collapse: separate;
     border-spacing: 5px;
 }
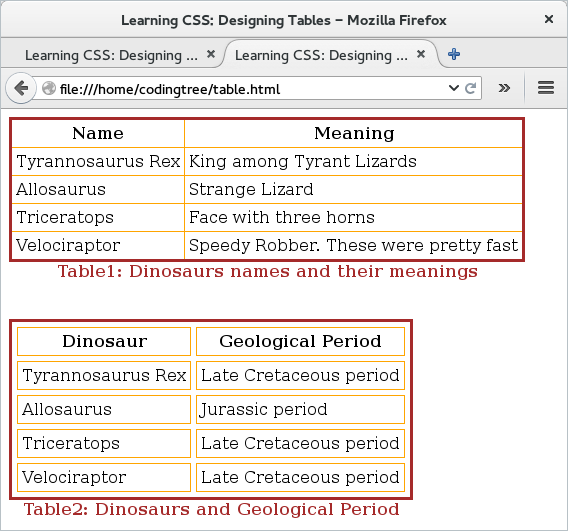
From the output (shown below), we can see that there is no space in between cells for the first table. But the second table still has each cell separate with added space between them. Since the rest of the design is same for both tables, the two tables appear similar in other aspects.

Figure: Table Design: border-collapse and border-spacing
We would like to wrap up this page on one final note. A table is like any other element and the browser treats a table also as a border. Accordingly, typical box-related properties like margin, border, padding, etc also apply to a table or table child-elements like th, td, etc. We have already seen the example of using the border property to adjust the border-thickness, border-style, and border-color. If needed, we could also update other border-properties like padding, margin etc.